

If you’ve never painted a cooler, you’re missing out.
This is a super fun art project and awesome gift for a loved one (or yourself). After my third round, I think I have a pretty good handle on cooler painting. I heard about them all throughout college and maybe caught glimpses of girls’ painted cooler masterpieces on Facebook.
Most of the coolers I saw or heard about were for fraternity formals; every now and then I’d see one done for another event, or just for fun. I didn’t know much about Greek life or culture, despite my best friend being Greek-affiliated, but I sure admired those coolers. I didn’t think I’d ever have the patience to create something that beautiful, but I wanted to try.
So one day over the summer, I painted one myself. It ended up as a gift for my then-boyfriend; for my first cooler, it turned out great and I was super proud of it. I painted a small one for my dad for Father’s Day last year. This year, I finally painted a cooler one for myself. And I love it.
I guess you could say I’m now a cooler painting pro.
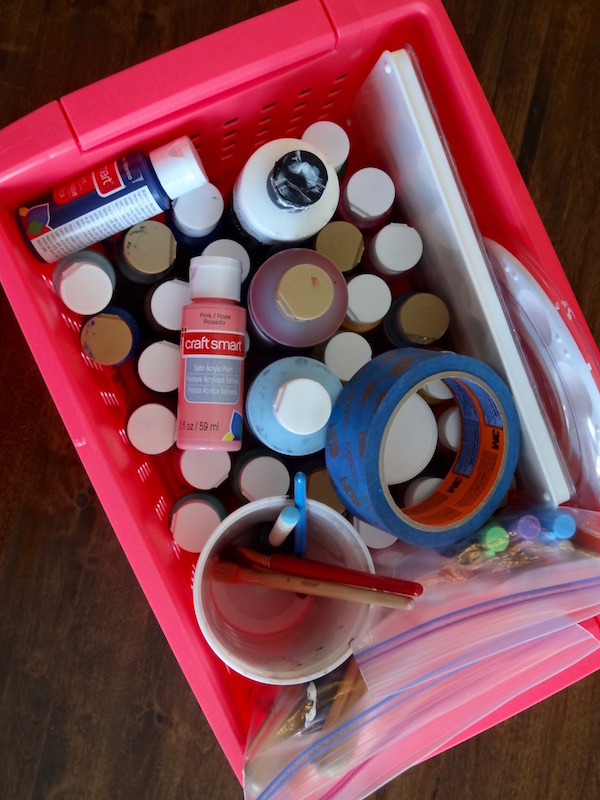
To paint a cooler, you will need:
- Cooler (hard, sturdy)
- Surface cover (old bed sheet or comfy bamboo sheets, towels, etc.)
- Primer (I prefer the aerosol spray kind)
- Acrylic paint
- Paint pens (these come in handy for details)
- Assorted paintbrushes
- Painter’s tape
- Tissue paper and marker (for tracing)
- Clear sealant
I definitely recommend sketching your ideas for each panel of your cooler before you start priming and painting. My coolers have all had “themes,” so each panel revolved around that. My latest cooler is “Chattanooga” themed, largely inspired by some of my favorite sights around town and traditions from the 4th-division soccer club I support, Chattanooga FC. But if you’re the type who can paint right on your cooler, then go for it, more power to you.
Step 1: Pick your cooler.
Bigger coolers give you more space to get artsy and creative. My current cooler is about 20 quarts in size, which is perfect for my purposes. My dad’s is a little six-pack cooler, which was perfect for him. You can find an assortment of coolers at Target, Walmart or your local sporting goods store. Do not get a styrofoam cooler. It will fall apart in a minute. Get a hard cooler.
Step 2: Sand your cooler.
This step is crucial! Even if your cooler is already pretty smooth, give it a good sanding so it’s smooth and the primer and paint will stick to it. I’ve sanded by hand with sandpaper, and it takes a lot of time, patience and elbow grease. This time, my coworker was kind enough to sand my cooler for me with his electric sander. That was a much quicker process than sanding by hand.
After sanding, give your cooler a good wipe-down with a wet cloth, to clean off any remaining dust and sand. You’ll want a nice, clean surface to work on.
Step 3: Spackle any logos or embellishments.
Most coolers have some kind of raised logos and embellishments on the top or sides. All it takes is a little wall putty and some smooth strokes. Give yourself as smooth a painting surface as possible. Let the putty dry and then sand it down so it’s even with the rest of the surfaces. Give your cooler another wipe-down and get ready for the next step: priming.
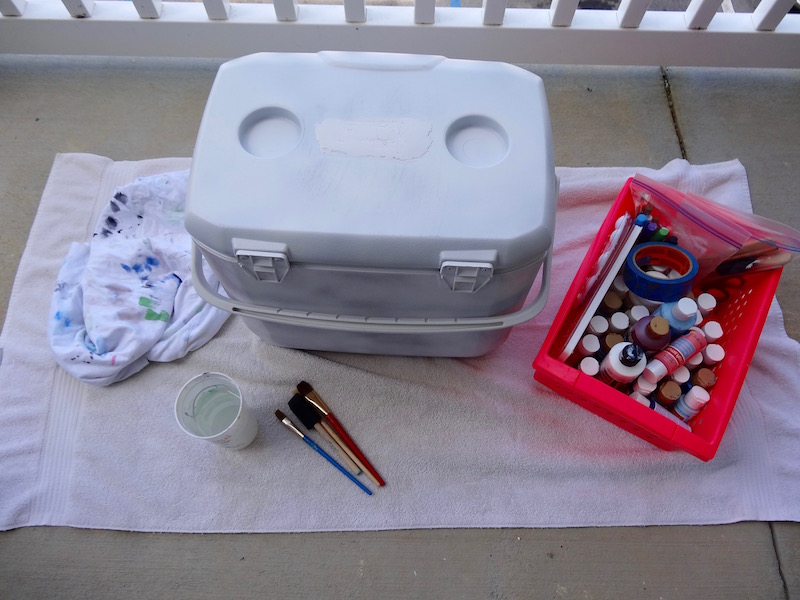
Step 4: Prime it.
Painting straight onto the surface doesn’t work because the paint has nothing to “stick” to. I used an aerosol spray primer and that worked perfectly. However you prime your cooler, make sure you do so evenly. If it takes more than one coat, that’s cool, too. I usually do two coats of primer just to be safe.
Step 5: Paint it.
Now we get to the fun part!
I had each side of my Chattanooga-themed cooler planned and designed well before I primed and painted. I lined the top with blue painter’s tape and marked off each panel with tape so the different base colors wouldn’t mix. Once the base layers were dry, I lightly sketched some of my designs with a pencil, or at least marked some lines so my text would be straight.
Then, it’s all about the paint. I highly recommend having a variety of brushes and some paint pens for smaller designs and details. Paint pens are especially great for text. I’m a terrible paint free-hander, so I made sure I had paint pens in the necessary colors.
If you’re not comfortable freehand painting any of your designs or text, there’s a neat tracing method that works pretty well. Trace your desired image or design onto a piece of white tissue paper with a pencil, and then tape the tissue paper to your cooler. Then, trace that with a Sharpie or thick marker. The ink will bleed through and transfer onto your cooler, giving you a nice little outline to paint. You can also read about mixing paint with epoxy on Epoxy Resin store. This trick is a cooler-painting game changer.

The edges of the cooler are prime opportunities for creativity. You can paint something as simple as a bowtie along the edges, or even just some colorful stripes. One time, I saw a cooler with beer tap handles on the edges. Talk about creative! I went simple and painted my edges red and navy with three white stars on each (for the Tennessee state flag, of course).
Step 6: Seal it.
A clear lacquer sealant should do the job. I’ve also used good ol’ Mod Podge for smaller projects. Like with primer, make sure you seal your cooler evenly, and two coats is fine if you think your cooler needs it. I say an extra coat can’t hurt.
And now for my finished project…
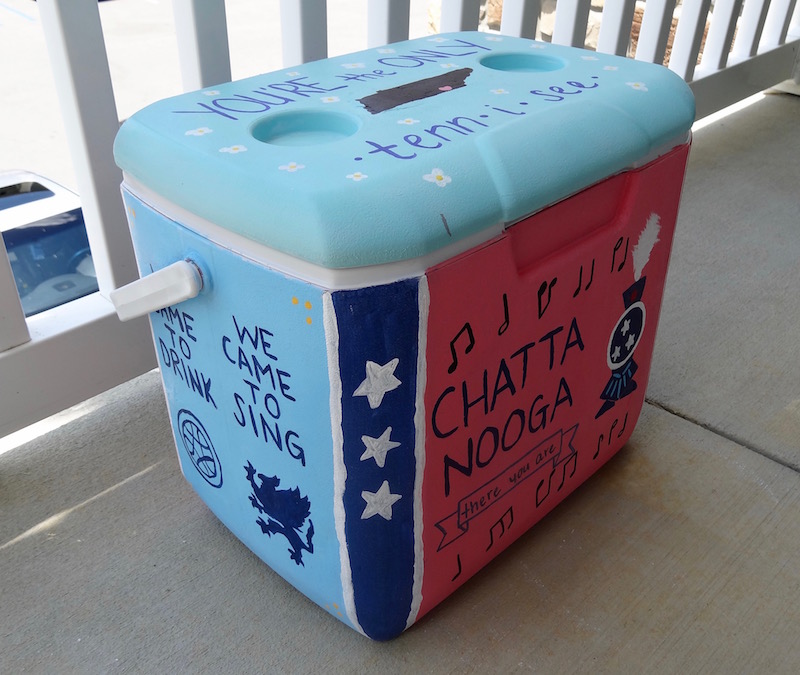
The pink front is an homage to the famous “Chattanooga Choo Choo” song, which is sung in the 29th minute of every home Chattanooga FC match. The light blue side was inspired by CFC’s supporter section, the Chattahooligans, and one of my favorite songs we sing. Chattanooga, we are here!
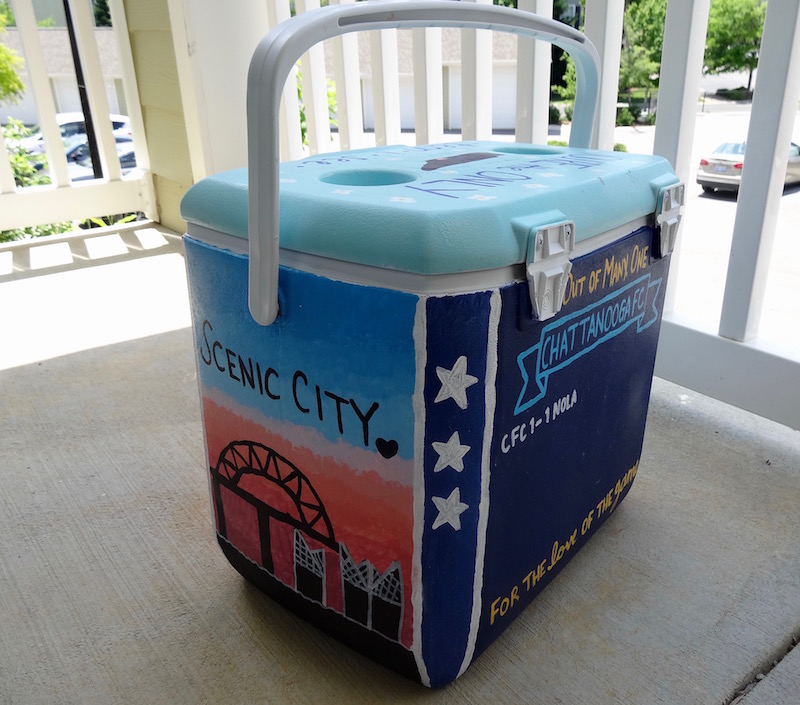
The back, navy side will be updated with the score of each match. And I couldn’t paint my Chattanooga cooler without a nod to two of the city’s most iconic landmarks – the Walnut Street Bridge and triangular Tennessee Aquarium roofs.
Cooler painting is quite an undertaking, but a fun undertaking. You can make your cooler as special and meaningful as you like, especially if it’s meant as a gift. The good news is, there is no limit to cooler painting; your options are endless.
Once you paint one cooler, you’ll want to paint another. And another… and another. But if you need to repaint your home, it’s better to hire a professional at Alex Trend Painters.
Have you ever painted a cooler? How crafty are your cooler painting skills?